These garments are a modified T-shape with the slope of the shoulder cut into the garment (a regular T-shape garment does not include the shoulder slope). Because the directions below use measurements as the cutting guide, the resulting robe will be customized to a specific individual. If preferred, basic sizes like small, medium, large, and extra-large could be established and patterns created from the following guidelines so that robes could be constructed by size.
These instructions can be downloaded in PDF format form the Download Materials page. In the following illustrations, dotted lines are guide lines. Fabric is cut on the solid lines.
Measurements
Constructing a customized robe requires the following measurements:
- Circumference of head
- Circumference of neck at base
- Shoulder width between base of neck at shoulder and top of shoulder above the arm
- Chest or Bust circumference
- Waist circumference
- Hip circumference (if hips are of extreme proportion to waist)
- Shoulder to floor
- Length of arm from shoulder to wrist
Fabric Requirements
Using 45- to 60-inch wide fabric, each robe will need two times the shoulder-to-floor measurement plus 4 to 6 inches. Depending upon the width of the fabric, extra yardage may also be needed for sleeves and neckline facings.
Prewashing
Prewashing the fabric eliminates potential shrinkage problems and adds to the warm, worn look of the costumes. If desired, fabric can also be over-dyed with tan, taupe, or cream to further enhance this softer appearance. Dyeing can also be done after the garment is constructed.
Layout of Fabric
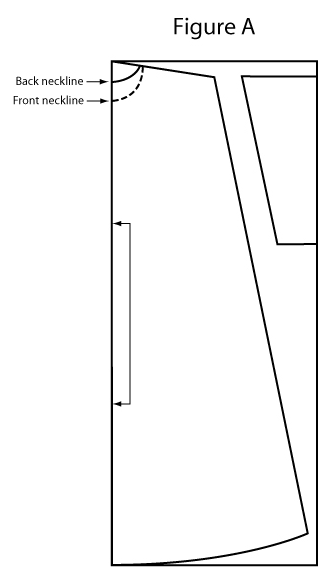
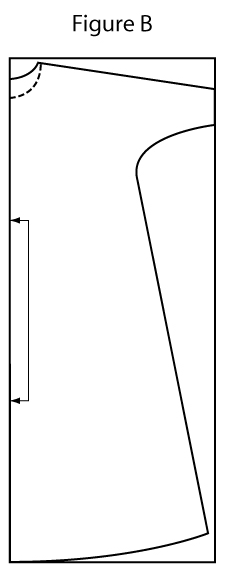
Fold fabric lengthwise matching selvage edges. Then fold the fabric in quarters matching fold lines and selvages. This will enable you to cut both front and back pieces simultaneously. Before cutting, you will need to determine whether the sleeves are cut separately, as in Style A (see Figure A), or as part of the basic robe Style B (see Figure B). You may also wish to measure and mark all guide lines before actually cutting the fabric.
Shoulder and Neckline
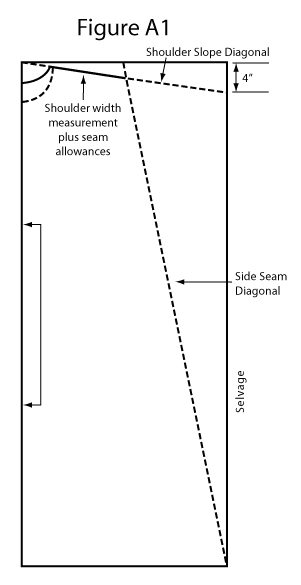
The shoulder slope is cut from the center fold of the fabric quarters on a diagonal that drops down 4 inches at the selvage edge (see Figure A1). If the sleeves are set into the robe as in Figure B, you can simply cut this entire line from center fold to selvage. If the sleeves are separate pieces, as in Figure A, you should mark the shoulder slope but wait to cut it until you have determined the side seam diagonal. Then, when cutting the shoulder, be sure that the length from neckline to side seam is at least the individual’s shoulder width measurement plus seam allowances. You may also choose to cut the shoulder longer to created a dropped shoulder seam.
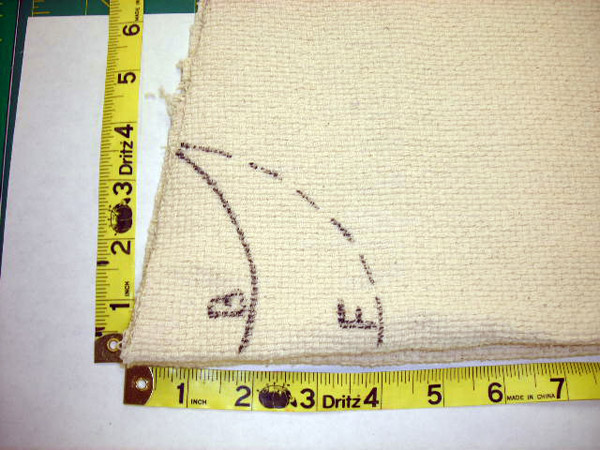
After cutting the shoulder, cut neck openings, beginning with the back—the higher neckline. Make sure the opening is wide enough to go over the individual’s head. Then separate the two pieces of fabric, and cut only one lower, front neckline (see picture).
Side Seam
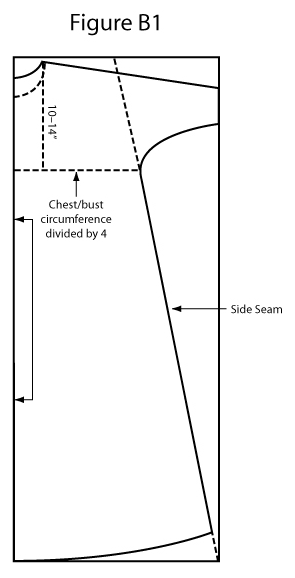
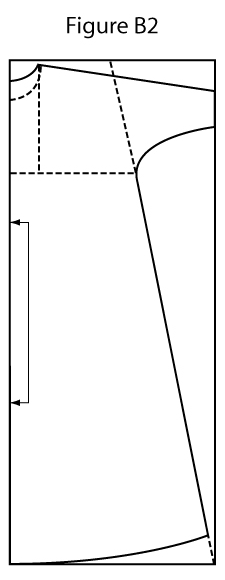
The side seam is cut on a diagonal from the shoulder to the full width of the fabric at the hemline (see Figure A1). Before cutting, make certain there is enough width to cover the fullest part of the chest/bust. To do this, measure from the fold across the chest/bust area to the side seam diagonal. (On most adults, the fullest part of the chest/bust falls 10–14 inches below the shoulder point, where the shoulder meets the base of the neck. An average of 12 inches works well as a guide. If you are working with a particularly large or small person, it may be helpful to take this measurement.) From the fold to the side seam diagonal should be at least 2 inches larger than the individual’s chest/bust circumference divided by 4 (see Figure B1). This provides for seam allowances and additional ease in the robe. If necessary, adjust the side seam diagonal outward to accommodate. Usually if there is enough width for the chest, the diagonal will also accommodate the stomach and hips. If working with an extremely small or large individual, you may also wish to check the hip measurement against the diagonal in the same manner.
Length
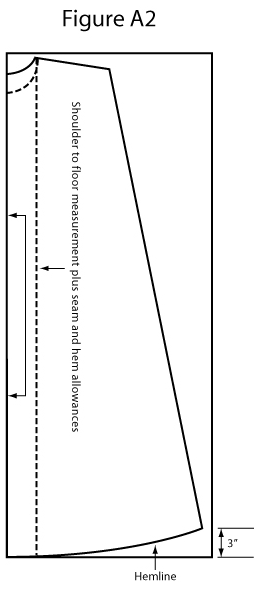
To determine length of the robe, take the individual’s shoulder to floor measurement and add shoulder seam and hem allowances. Measure this length parallel to the fold from the high point of the neckline. At the appropriate length, draw a straight line perpendicular from the fold to the selvage. Then mark a point on the selvage 3” above this baseline and draw a gradual curve from baseline to selvage. This creates the curve at the hem line (see Figure A2).
Sleeves
Style A uses a flat sleeve that is set in, while the sleeve in Style B is cut as part of the robe. The choice of fabric, its weave, and any shrinkage may necessitate adaptations in how the sleeves are cut and constructed.
Style A
The set-in sleeve is cut as shown in Figure A. The sleeve’s length is determined by the individual’s length of arm measurement plus seam allowances. Sleeve width should allow plenty of ease through the upper arm and is tapered from the armhole to the wrist, with enough room for the hand to fit through the opening plus seam allowances. If the sleeve is cut as laid out in Figure A, you will need to seam the sleeve along the selvage edge and therefore should also include a seam allowance for the selvage edge in the width. This same sleeve could be cut out on a fold where it would not require additional fabric for that seam allowance.
Style B
If the fabric is wide enough, you can easily cut the sleeve right into the body of the robe, as in Figure B. This is done by continuing the shoulder slope diagonal out to the selvage edge. This line creates the top of the sleeve. The underarm of the sleeve should start at the chest/bust measurement or slightly above (see Figure B2). Allow enough ease for the upper arm and taper toward the selvage edge, leaving enough room for the hand to fit through the wrist opening. Depending upon the size of the person, you may need to add a sleeve extension to provide extra length.
Sewing the Robe
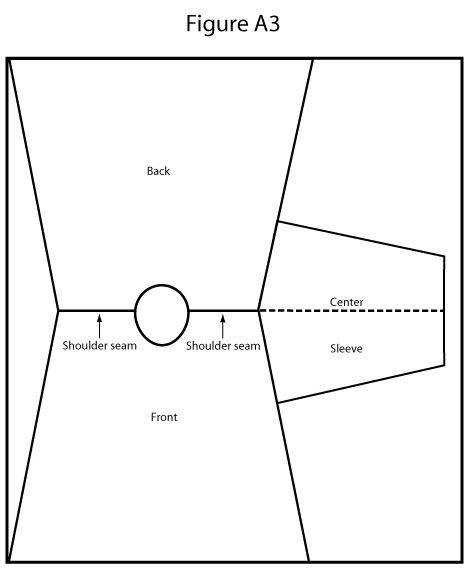
Once the fabric is cut, sewing the robe is simple. For Style A, sew back to front at shoulder seams. If sleeves were cut as in Figure A, seam the top of each sleeve. Then set the sleeves, matching the shoulder seam with the center of the sleeve cap (see Figure A3). Sew underarm and side seams as one continuous seam. For Style B, sew back to front at the shoulder seams (which includes top of sleeves) and side seams (which includes underarm seams). For both styles, hem the sleeves and bottom of robe to fit the individual, and finish the neckline as desired.
Finishing the Neck
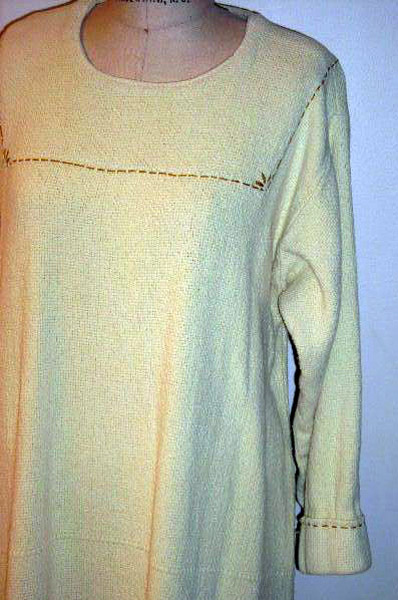
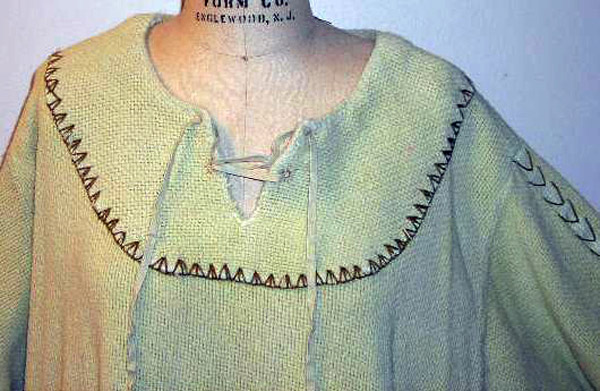
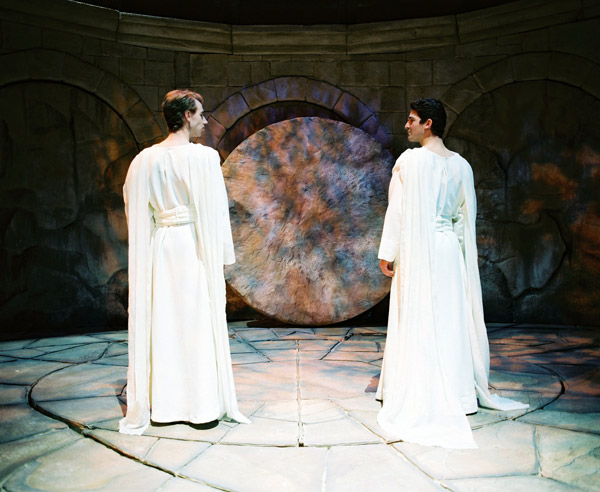
The neck can be finished in many ways. The easiest way is with a bias strip. Facings can also be used and can be made in all sorts of shapes and sizes. Facings may be turned to the inside or lie on the outside of the garment with a decorative finishing stitch. If the neck opening is not large enough, a slit can be made down the center of the front or back of the garment to allow it to be pulled over the head. These slits can be finished with bias or a facing. They can be laced closed, or snaps or other fasteners can be used. All necklines can easily be finished and/or filled in so that temple garments can be worn underneath the costume. Creativity and detailing will add to the individualism of each costume (see pictures for examples).
 |  |  |
Angel Robes
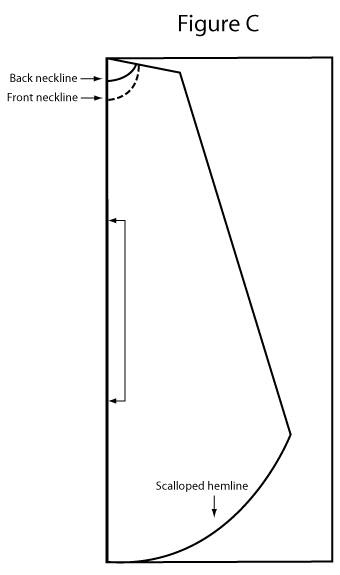
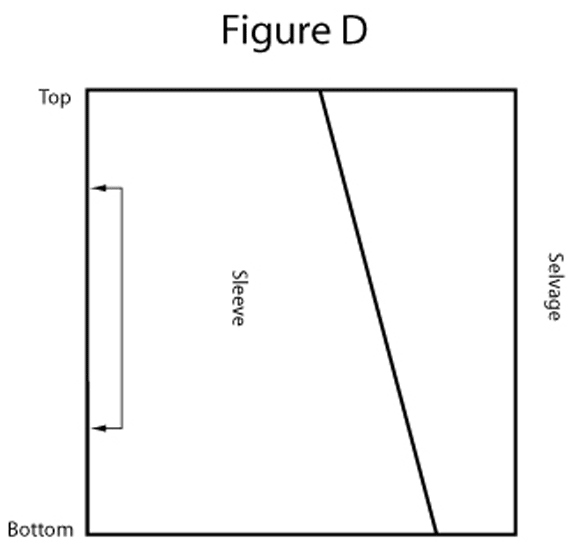
For the Conference Center Theater production, angel robes were constructed in a manner similar to that of basic robes with three differences. First, they were most often cut shorter than robes. Sometimes they were cut with a deep scallop on the hem line (see Figure C). Second, the sleeves were cut in a bell shape. Rather than tapering to a narrow wrist as in the basic robe, the sleeves on angel robes were wider at the wrist (see Figure D). Finally, all necklines were finished with a bias and were kept very neat.
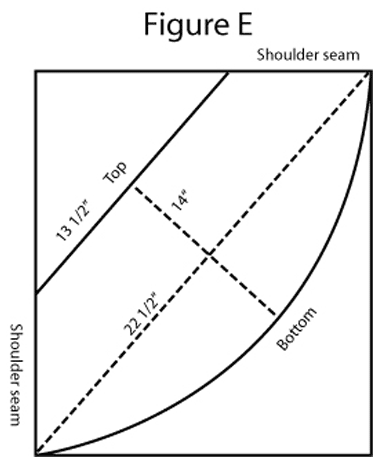
To create greater individuality, additional details such as cowls and streamers were added to some of the angel robes. Cowls were made from strips of fabric cut on the bias (see Figure E, dimensions are approximate). The two pieces were hemmed or serged on top and bottom and then pleated into the shoulder seams (see pictures below).
Some angel robes had cowls in front and back. Other robes had streamers that fell from the shoulders down the back. These were made by using bias strips about 12–14 inches wide and 3–4 feet long. The strips were hemmed on three sides, leaving one short side to be pleated into the shoulder seam (see picture of angels at the tomb).
 |  |  |
![]() Return to the Costuming main page.
Return to the Costuming main page.