 The purpose of this songbook is to teach children the gospel of Jesus Christ through music. The Children’s Songbook is designed for use in Primary, in the home, and wherever children’s songs are appropriate. Many of the songs are simplified so that beginning musicians can be successful in playing them.
Songs of similar subject and mood are generally found in the same section. For example, the section about the Savior tells of his birth, childhood, and ministry. It concludes with songs that remind us of his role in our lives today and that tell why we want to be like him. Songs placed in a specific section should not be limited to use in that category only. For instance, you may wish to look at “Jesus Christ—Example” in the Topics Index (p. 309). Notice that the songs listed under that heading are located in several of the sections.
- How to Teach a Song to Children
- How to Add Variety to Singing
- How to Conduct a Song
- How to Play or Accompany
- Copying Music
- Features of the Songbook
- Chord Chart
- Chording
- Explanation of Symbols and Terms
How to Teach a Song to Children
Children learn to sing a song by hearing it sung many times. Begin teaching a song by singing it to the children. Involve the children by asking questions about the song that challenge their thinking. A leader should keep two steps in mind when teaching a song to children:
Know the song. Before you can teach a song effectively, you must know the song yourself. You can become familiar with the words and melody by playing the song on the piano, listening to a tape recording, or finding someone to sing or play it for you. Study the song and decide what message the words convey. Ask yourself how you might use any scripture references at the end of the song in your preparation or in teaching the song. Look for key words and words that rhyme, as well as for words that the children may not understand or may not know how to pronounce. Notice melody or rhythm patterns that will make the song easier to learn. Practice the song over and over until you know it well.
Make a plan. Ask yourself:
- How can I capture the children’s attention? (Perhaps with an object, a picture, a scripture, an experience, or simply a whisper.)
- What questions can I ask that will encourage the children to listen to the song? (Ask questions that help the children understand the gospel message—for example, What? Where? Who? When? Why?—and state the questions in such a way that children can discover the answer as you sing the song.)
- How can I encourage the children to sing the song? (Invite the children to sing the phrases that answer the questions. Vary the tempo and the volume to add meaning. Ask the children to listen to their singing without accompaniment. Expect the children to sit tall and to watch you carefully.)
- What testimony can I leave with the children that will strengthen them? (Bear your personal testimony, or read testimonies recorded in the scriptures.)
How to Add Variety to Singing
You may teach any of the songs in this book as they are printed, omitting any optional parts or combinations of parts. However, to add variety, you may:
- Use alternate words that can make the songs more appropriate for specific occasions. (See “Rain Is Falling All Around,” p. 241.)
- Teach songs with suggested actions, or have the children help you improvise actions where indicated. Young children who have not yet found their singing voices may participate through movement. (See “Head, Shoulders, Knees, and Toes,” p. 275.)
- Assign small groups to sing different sections or verses.
- Use songs that have two parts to sing together or optional parts such as descants, ostinatos, and obbligatos. These additional elements challenge the children and allow them to experience harmony. (See “I Am a Child of God,” p. 2.)
- Arrange a medley of two or more songs that have similar messages or that tell one story. Interludes between songs could be created from the suggested introductions.
- For special occasions, have a child sing a solo, or ask a group of children to sing as a chorus.
- Have the children hum or sing several songs as prelude music.
How to Conduct a Song
A music leader has the opportunity to influence children. Your enthusiasm, preparation, and testimony will help strengthen children’s testimonies of the gospel.
As children begin to learn a song, help them follow the direction of the melody by pitch-level conducting. This is done by moving your hand up and down according to the pitch in the melody. Your hand may also move back and forth slightly to show the length of the notes. In this way, pitch-level conducting illustrates the rhythm of the melody as well as the direction.
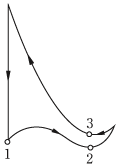
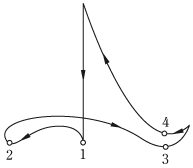
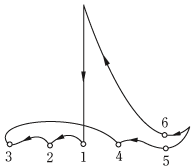
When the children have learned the song, you may want to use the standard beat patterns on the following page or a combination of pitch-level conducting and beat patterns.
Look at the top number of the time signature to determine the number of beats per measure (See “Explanation of Symbols and Terms,” p. 303). The tempo or speed of each song is indicated by the metronome marking (See “Tempo Markings,” p. 301).
For music with nine beats per measure, use the three-beat pattern (See “The Sacred Grove,” p. 87). For music with twelve beats per measure, use the four beat pattern (See “Baptism,” p. 100).
How to Play or Accompany
The way a song is played influences the way children will sing it. As you practice the songs, pay attention to the mood markings. By observing the correct tempo and volume, you can create the desired mood and encourage expression in the singing. You should support the voices but not dominate them.
Appropriate prelude music creates a reverent mood and establishes a spirit of worship in meetings. Many of the songs in this book, such as prayer songs, are suitable for prelude or postlude music. Playing songs for prelude music that the children are to learn can help them become familiar with the melody.
Copying Music
The Church has made every effort to obtain the maximum possible use of the musical works contained in this songbook. However, the rights of the authors and copyright owners must be respected.
Songs having the notice © (year) IRI at the end of the song, songs having no copyright notice, all illustrations, and general materials in this book may be copied for noncommercial church or home use. Songs showing copyright notices other than © (year) IRI and printed with the statement “This song may be copied for incidental, noncommercial church or home use” may be copied for the uses indicated. If a copyright notice appears with a song, the notice must be included on each copy made.
Songs on pages 37, 97, 182, 201, 217, 229, 238, 247, 265, 271, and 273 are under copyright restrictions and must not be copied for church, commercial, or home use. Permission for the Church to include these songs in this songbook does not include the right to copy them.
Features of the Songbook
Tempo Markings
Metronome markings are given in the left corner above each song as a guideline for the tempo. The metronome measures beats per minute. For example, the marking below tells you that it is appropriate to sing the song between 56 and 72 beats per minute (one quarter note per beat).
 = 56-72
If you do not have a metronome, use a watch or clock with a second hand. The second hand will measure 60 beats or seconds per minute. Use this rate as a point of reference. For example, if the marking is 120, you would figure two beats per second.
Introduction Brackets
The purpose of an introduction to a song is to introduce or review the melody and give the beginning pitch. There are many ways to play an introduction. If the song is short, the entire song may be played. Playing the entire song as an introduction is especially appropriate for prayer songs. If the song is long, the first and last word phrases may be played. For each song, brackets indicating a suggested introduction are given above the melody line if the song does not have a written introduction.


Fingering
Some fingering is suggested to show one possible way to reach melody notes and chords. The fingering numbers are generally to the left of and slightly below the notes. Fingering helps to locate the beginning hand position, shows when to change position, and also suggests ways to play difficult passages.
The thumb is1, and the other fingers follow in order to5.

Standard Conducting Patterns
|
The two-beat pattern |
The three-beat pattern |

|

|
|
Used for songs marked |
Used for songs marked |
|
The four-beat pattern |
The six-beat pattern |

|

|
|
Used for songs marked |
Used for songs marked |
Chording
The songs in this book include chord symbols that you can use to harmonize the melodies of the songs. The chords indicated may not always correspond exactly with the written accompaniment, but they provide simplified harmony.
Letters representing standard chords are written above the accompaniment of most songs. Chord notation is helpful if you prefer to play the melody of a song with the right hand and chord with the left hand (see the chart on page 302).

If you are chording on a keyboard, play only the melody with your right hand and the chords with your left hand. Some electronic keyboards will allow you to play chords by pressing buttons provided for that purpose.
Play the same chord until a change is given. If a chord symbol appears in parentheses, the chord change is optional. If you are unfamiliar with any of the chords, you may wish to copy the chord chart so that you can place it next to a song you want to play.
If you are just learning to chord, you may want to play the following songs: “A Special Gift Is Kindness” (p. 145), “I Am Glad for Many Things” (p. 151), “Stand for the Right” (p. 159), and “I Pledge Myself to Love the Right” (p. 161).
Chord Chart
This chart shows only the chords used in the songbook. All chords are major unless the chord letter is followed by an m (minor), dim (diminished), or aug (augmented). The augmented chords are grouped together at the bottom of the chart. The number 6 or 7 adds a note to the basic chord. Some of the chords are simplified, and this chord chart sometimes shows the inverted position of the chord that falls within the octave below middle C.
 In a guitar chord diagram, the vertical lines represent strings,and the horizontal lines represent frets. The dots show whereto place the fingers of the left hand. |
 When a number appears to the left of the diagram, the chordposition begins on that fret. In this example, the position of theindex finger is shown to be on the sixth fret down on the guitar. |
 An x above a string indicates that the guitarist should not sound thatstring while playing the chord. An o is an “open” string, one that is playedbut not fingered. A bar shows that one finger should hold down more than one string. |
It is possible to play some songs in easier keys by transposing or by using a capo (a guitar attachment). For example, songs in the difficult key of F may be played more easily down one half step in the simpler key of E; songs in the key of B-flat may be transposed to A, and so on.
Although the chart shows the chords for keyboard and chord diagrams for guitar, the chord symbols can also be used for other instruments, such as the autoharp. Keep in mind that piano is the standard instrument for Primary.
Explanation of Symbols and Terms
 The staff with the bass clef generally includes the left-hand accompaniment, below middle C. |
 The staff with the treble clef generally includes the melody and the right-hand accompaniment, above middle C. |
 The time signature is given at the beginning of each song. The top number indicates the number of beats in each measure. The bottom number tells what kind of note gets one beat. For example, the 3 in a 3/4 signature means that there are three beats in each measure in the song. The 4 means that every quarter note gets one beat. |
 The natural sign cancels a sharp or flat. |
 Parentheses around a sharp, flat, or natural indicate the sign serves as a reminder. A note in parentheses may be needed in one verse, but not in another, or it may be a note already being played by the other hand. A chord letter in parentheses indicates that the chord change is optional. |
 Cue notes are optional, small notes that add harmony. (See “He Sent His Son,” p. 34.) The notes may be sung or may be played on the piano. |
 For a triplet, the three notes are played on one count. (See “Shine On,” p. 144.) |
|
8va = An 8va above the top staff means that you play the notes an octave higher. An 8va below the bottom staff means you play the notes an octave lower. (See “The Thirteenth Article of Faith,” p. 132; “When I Go to Church,” p. 157.) This marking affects only the nearest staff of music, unless otherwise stated. |
 This bracket shows that a note in the bass clef is to be played by the right hand. |
 A fermata (fer-MAH-tah) is a pause or hold. The note is usually held at least half again the note value. (See “The Chapel Doors,” p. 156.) |
 Accents show that notes or chords should receive emphasis. |
 A staccato mark above or below a note head indicates that the pianist is to play that note crisply. |
 Pedal markings show passages where it is especially helpful to use the damper pedal. This pedal (the pedal to the right on a piano) should be used sparingly, generally to connect notes that the hands cannot hold. (See “Children All Over the World,” p. 16.) |
  Two songs, “Love One Another” and “Teach Me to Walk in the Light,” have bow markings for violinists. The |
 The phrase mark tells you that these notes should be connected or played smoothly. |
 A slur shows when two pitches are used for one syllable or when to connect notes on the piano (play smoothly). |
 A tie (between two notes of the same pitch) lets you know that you should play or sing that note once and hold it for the total value of the two. Sometimes notes are tied in one verse of a song and not in another. |
 For a rolled or harplike effect, play the notes one at a time from bottom to top rather than striking all at once. |
 The breath mark, which looks like a large comma, indicates a slight break in the music. Singers should take a breath at this point. |

A crescendo means that the music grows louder. |

A decrescendo means that the music grows softer. |
|
Volume markings are given sparingly in this songbook since most songs are sung at a moderate volume. Below, the standard (Italian) markings are shown in relation to each other from softest to loudest. |
|
|
|
|
|
|
|
|
|
|
|
|
 Music between the repeat bars is played twice. (See “The Sacred Grove,” p. 87.) If only one sign is given, repeat from the beginning of the music. |
 Some songs have more than one ending. The first time through the song, use the measures for the first ending. Repeat as indicated, skipping the first ending and using the second ending as directed. (See “I Know My Father Lives,” p. 5.) |
|
fine = This marking means “the end” (finale). |
|
D.C. al fine = Da capo al fine means to return to the beginning and play to the word fine. (See “All Things Bright and Beautiful,” p. 231.) |
|
D.S. al fine = Dal segno al fine means to return to the sign |
|
|
|
D.S. al coda = Dal segno al coda means to return to the sign |
|
octaves ad lib = This phrase indicates that the pianist may improvise by adding the same notes one octave lower to create a strong bass. (See “I Will Be Valiant,” p. 162; “A Young Man Prepared,” p. 166; and “Called to Serve,” p. 174.) |
|
rit. = Ritardando means to slow the music gradually. (See “He Sent His Son,” p. 34.) |
|
a tempo = These words indicate that the music returns to the original speed. (See “The Chapel Doors,” p. 156.) |
|
simile = This term means to continue in the same way . In this songbook, it sometimes appears after pedal markings—meaning that the pianist should continue to use the damper pedal in the same way as before. (See “Where Love Is,” p. 138.) |
|
ten. = Tenuto indicates that you should hold the note for the full duration of the time value. (See “Had I Been a Child,” p. 80.) |
|
descant = A descant is an optional voice part with words of its own. It is possible to play a descant as an instrumental part. (See “Hosanna,” p. 66.) |
|
obbligato = An obbligato is an optional instrumental part above the melody. Sometimes the part is in a range suitable for voice using the same words as the melody. (See “Keep the Commandments,” p. 146.) |
|
ostinato = An ostinato is a repeated musical pattern (often two pitches) sung with a song. (See “Quickly I’ll Obey,” p. 197, or “Westward Ho!” p. 217.) |
|
round = A round is a song that is repeated (usually two or three times) by several groups. One group begins the song, and—at numbered measures—other groups begin. (See “Sing a Song,” p. 253.) It is effective to sing rounds unaccompanied—the harmony of the voices acts as the accompaniment. |
|
two-part song = A two-part song has two melodies that can be sung at the same time. Often part one is sung alone, then part two is sung alone. (One part can hum while the other sings.) Then the two parts are combined and sung together. (See “Love Is Spoken Here,” p. 190.) |
 ,
, or
or 
 or
or
 or
or
 (pianissimo) = very soft
 (piano) = soft
 (mezzo piano) = medium soft
 (mezzo forte ) = medium loud
 ( forte) = loud
 (fortissimo) = very loud
 and play to fine. (See “
 coda = A coda is an added section at the close of a piece of music. To use the coda, play to the
  , then skip to the matching